Bingo was trying to assist me in my endeavor by providing sound effects while I was working. He was running around "capturing his toys" and making this spine tingling noise when he carried them into the room and presented them to me. Gracie also got into the act by hissing at Bingo for being such an idiot and disturbing her nap. And of course, Coco could not be left out so he began thumping his feet at all the the excitement. Alas, even with all of the sound effects, it did not help (but it sure made me jump a few times). Rather than continuing to frustrate myself, I just rolled with the punches and changed directions. I made a "cute" little cemetery card.
The Making of a "Cute" Little Cemetery Card
Card Statistics
- Final Card Size: 5.5" wide x 4.25" tall
- Image Size: 3" wide x 2.75" tall
- Tools: paper cutter, scissors, Martha Stewart mouse and tombstone punch, ruler, sponge pieces, Martha Stewart scoring board
- Materials: Prismacolor pencils
, stamps, ink pads, Xyron adhesive
, cardstock, Halloween paper, grosgrain ribbon, white gel pen
- Card can be purchased in my Etsy shop: Cute Little Cemetery Halloween Card
Card Front
I stamped the ghost and tombstones on white cardstock with Stazon black ink. The ghost was filled in using a white gel pen and then given more depth with Prismacolor pencils. I also used Prismacolor pencils to shade in the tombstones.
The moon was created using a stencil made from cardstock with a circle punched out of it. I sponged in the yellow ink and added depth with Prismacolor pencils. After completing the moon, I covered it with the cardstock circle that had been punched out for the stencil and sponged in the rest of the background. Stamping the bat on the moon was the final step in completing the image. I matted it on black cardstock.
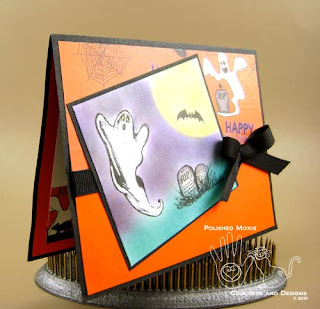
Black card stock was also used for the base card which I cut and scored. Orange cardstock and a cheerful Halloween print paper were layered on the card base to add interest. Black grosgrain ribbon was positioned where the two papers intersect prior to adhering them to the base card. The matted image was placed into position and a bow supplies a little pizzazz and dimension to the whole thing.
Angle View of Card Front to Show Dimension
As you can see, the only true dimension to the card is the snazzy little black bow.
I also enjoy decorating the inside of my cards to give them a more polished look.
Card Inside
I found the perfect sentiment for the card and it was printed on white cardstock matted with orange. A strip of the Halloween paper with an overlay border of mice and tombstones punched from black cardstock adorns this sentiment panel. I added a little shimmer paint to the punched border.
This completes the card, however, I also custom make an envelope from scratch to compliment the card. The envelope is made from a heavy cover stock and I incorporate an image or embellishment to reflect the card and tie everything together. For this ensemble I stamped the same ghost used on the card and sponged background color around it.
Final Card and Envelope Combo
Purchase this Card and Envelope set in my Etsy Shop: Cute Little Cemetery Halloween Card
Tidbit of wisdom from the experience: Place scraps of Xyron adhesive immediately into the trash can. This stuff is hard to get out of the long hair of a cat's tail that has sat on it. Gracie was none too pleased with me!
Card Recipe Specifics
- Cardstock: Staples, Recollections, Wausau
- Stamps: Fiskars Halloween Trick or Treat
- Halloween Paper: Stemma Masterpiece Studios
- Ribbon: Michaels
- Ink: Colorbox
, Stazon
- Prismacolor Pencils
: lemon yellow, sky blue light, cool grey 30%, warm grey 50%
- Punch: Martha Stewart
Thank you for visiting and I hope you come back soon!
Page Content © 2010 Polished Moxie Concepts and Designs


Welcome to the world of blogging. I love your Halloween cards! They are so colorful. Hope you will stop over and visit me.
ReplyDelete