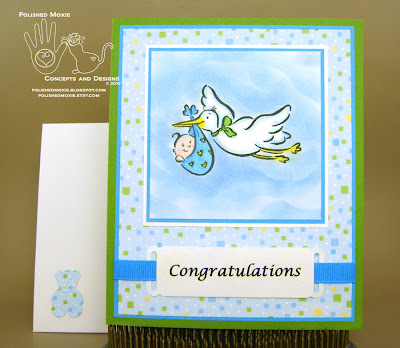
Since I knew that the image for my baby card was going to be a stork, my next step was to determine colors. I rummaged through my paper stash and found an interesting patterned paper with colored squares of various sizes on a pale blue background. This paper determined my color palette of apple green, aqua blue, and white with a dash of yellow. Needless to say, my finished stork baby card is probably more appropriate for a newborn baby boy which means I'll be making another baby card at a later date for a baby girl.
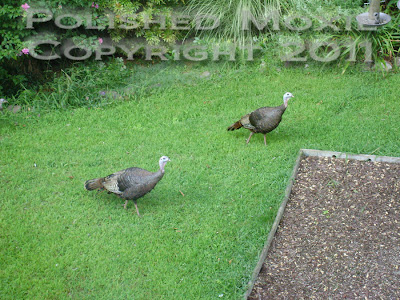
Oh my goodness! As I'm sitting here contemplating this blog post with Bingo my feline buddy beside me, we hear noises coming from the backyard. We're both stretching as far as we can in the window to see what is creating the sounds. And then we see them come around the rose of sharon and headed to the bird feeding area. There are two of them and I grab my little camera that is always with me and take their picture.
 |
| Two wild turkeys headed to their outdoor bistro |
Two wild turkeys. This really gets Bingo excited. As we watch the two turn into four.
 |
| Two more wild turkeys join the first two for dinner |
Then the four turn into eight.
 |
| Four more wild turkeys join in the eating fest |
And finally, eight turn into ten.
 |
| The last two wild turkeys are fashionably late |
What a sight. I don't know who was more excited Bingo or me! Once in a while we see a wild turkey passing through our yard, but usually it's just a couple of them. This is the first time I've seen a whole passel of them at the bird feeding area. It looks to me like there are several baby turkeys in the group. How fitting is that for my post today sharing a baby card?
Here's another picture that gives a better perspective of our visitors and the differences in their size (one is trying to hide behind the pole in the grass).
 |
| Ten wild turkeys enjoying dinner in the company of others |
Well, they're wandering back towards the woods so I guess we can get back to my stork baby card. But that was entertaining.
Handcrafting My Whimsical Stork Baby Card
Card Statistics
- Final Card Size: 6" tall x 5" wide
- Tools: stork and baby stamp, teddy bear punch, ribbon tag die, scissors, ruler, computer, sponge pieces, Cuttlebug machine, dry embossing stylus, scoring board, paper cutter, blending stumps
- Materials: cardstock, scrapbook paper, cover stock, ribbon, adhesive, ink, gamsol, colored pencils, scrap cardstock for sky stencil
- This card is available in my Polished Moxie Etsy Shop: Whimsical Stork Baby Card
Front Views of Stork Baby Card
 |
| Front of my stork baby card |
I selected an apple green cardstock for my card base to play off the apple green squares in the printed paper. After constructing the card base I created the topper panel. I started with aqua blue cardstock that matched the blue squares in the printed paper and layered it with the printed paper.
For my image I stamped the stork and baby on white cardstock and colored them using colored pencils and gamsol. I created the sky background by cutting the edge of some scrap cardstock so that it had uneven wave-like curves and used it as a stencil to sponge on color. I placed this homemade stencil in different positions and directions as I sponged on several shades of blue ink to give the background a cloudy sky appearance. Once I completed the stork and baby image I matted it with aqua blue and white cardstocks and affixed it to my topper panel.
To create the front sentiment I printed "Congratulations" on white cardstock and cut it out with a ribbon tag die on my Cuttlebug machine. I added some dimension to the tag by rubbing all of the edges in a circular motion with a dry embossing stylus. I ran a piece of aqua blue grosgrain ribbon through the tag and secured it in place below the stork and baby image. I affixed the completed topper panel to my card base.
Angle Views of Stork Baby Card to Show Dimensions
 |
| Stork baby card sitting at a right angle |
 |
| Stork baby card sitting at a left angle |
The sponged background on the stork and baby image adds a perception of depth to the card. My ribbon tag is really the only dimensional element on the face of the baby card.
Inside My Stork Baby Card
 |
| Inside of my stork baby card |
For the inside panel of the card I printed "You have a brand new reason to Smile" on white cardstock that I embellished with a strip of the printed paper. I popped a teddy bear punched from apple green cardstock on the printed strip.
I also constructed an envelope from heavy cover stock to compliment this card. To decorate it I affixed a teddy bear punched from the printed paper in the lower left corner.
Final Whimsical Stork Baby Card and Envelope Ensemble
 |
| Stork baby card and coordinating envelope |
This stork baby card and envelope ensemble is available in my Polished Moxie Etsy Shop: Whimsical Stork Baby Card
Card Recipe Specifics
- Cardstock: Hammermill, Wausau
- Patterned Scrapbook Paper: DCWV
- Cover Stock: Staples
- Stork and Baby Stamp: Rubber Stampede
- Teddy Bear Punch: Martha Stewart
- Ribbon Tag Die: Ribbon Tag Trio Two by Shapeabilities
- Stazon Ink: black
- Colorbox Pigment Ink: aqua, sky blue, glacier ice, royal blue
- Prismacolor Pencils: non photo blue, true blue, sky blue light, apple green, sunburst yellow, light peach, blush pink
- Ribbon: Offray
- Tools: Cuttlebug machine, Martha Stewart scoring board, Making Memories paper cutter, scissors, ruler, blending stumps, computer, sponge pieces, dry embossing stylus
- Misc: adhesive, silicone adhesive, scrap cardstock for sky stencil, gamsol
- Techniques: gamsol, sponging, dry embossing
Thank you for visiting my blog and allowing me to share my handcrafted whimsical stork baby card with you. I hope you enjoyed your visit and will come back soon!
Page Content © 2011 Polished Moxie Concepts and Designs


Hi Moxie!
ReplyDeleteLove this card! Your coloring is top notch! Thanks for you visit to my blog and your kind words!