 |
| Peek at My Handmade Girly Pink Birthday Card |
A handmade birthday card is what I had in mind when I sat down at my work table. Not just any birthday card, but a girly birthday card. A birthday card that would be feminine from top to bottom and have diva written all over it. A handmade birthday card with pearl embellishments and a shimmering ribbon, and pink...lots of pink. A card so girly that as my Daddy would say, "you get lace appearing on your underwear by just looking at it". What I came up with is a pink birthday card embossed with swirls and embellished with pink pearls and shimmering pink organdy ribbon. As I said, very girly, very pink, and with the potential for producing lace on your undershorts with just a glance. A handmade birthday card with high diva potential fit for a queen.
Speaking of queens...there is a cat in my house that thinks she's one!
 |
| My Cat Gracie Pretending to be a Queen |
Her majesty has taken up residence in a recliner and nested herself into an old fuzzy blanket to keep comfy while adorned with her green fashion statement. Gracie seems to think that her collar mimics those worn by queens centuries ago. Because I feel a bit sorry for her, I'll let her maintain her fantasy and get on with my card making.
I follow many challenge blogs and my Girly Pink Birthday Card reflects the following challenges:
- Card Crafter's Circle Challenge tic tac toe. I selected the row containing bling, ribbon, and die cuts from the grid. On my Girly Pink Birthday Card I used pink pearls for the bling, pink organdy for the ribbon, and a fancy border for the die cuts.
- Mark's Finest Papers Speedy Fox and Friends Challenge that requires several shades of pink in your project and allows the use of white. My Girly Pink Birthday Card fits the criteria with its 3 shades of pink cardstock, pink ribbon, pink sentiment, and pink pearls.
- One Stop Craft Challenge wants clean and simple. I think the design of my Girly Pink Birthday Card is clean and simple (for me anyway).
- Make It Monday where you can showcase one of your cards and I have selected my Girly Pink Birthday Card to showcase.
- Ribbon Carousel Challenge has joined with Party Time Tuesdays this week for anything goes. Ribbon Carousel requires that you incorporate something from a spool on your project. The ribbon on my Girly Pink Birthday Card comes off a spool.
Handcrafting My Girly Pink Birthday Card
Card Statistics
- Final Card Size: 5.5" tall x 4.25" wide
- Tools: border punch, swirl embossing folder, scoring board, paper cutter, scissors, cuttlebug machine, bow easy, computer
- Materials: cardstock, cover stock, ribbon, adhesive, pearls
- Card can be Purchased in My Polished Moxie Etsy Shop: Girly Pink Birthday Card
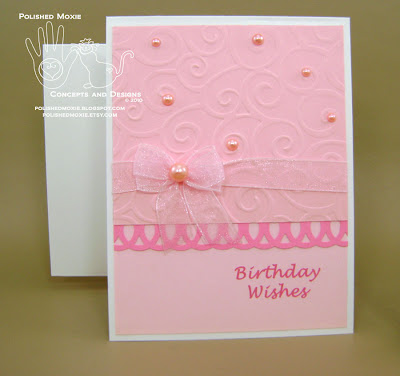
Front View of My Handmade Girly Pink Birthday Card
 |
| My Handmade Girly Pink Birthday Card |
I started off by creating my card base using white cardstock (looking at it now, I think I should have used dark pink cardstock to make the card monochromatic). I scored the cardstock across the top so that my Girly Pink Birthday Card opens vertically from the bottom.
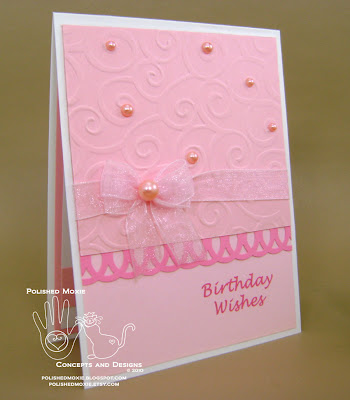
The top panel is a pale pink cardstock that I printed "Birthday Wishes" in dark pink on the lower quarter. I layered this panel with a piece of medium pink cardstock that I embossed with a swirl pattern using a Cuttlebug embossing folder and placed it over a dark pink cardstock with a punched border. Before affixing the panel to the card base I added a pink organdy ribbon and a double looped bow. To complete the top card panel I embellished the embossed swirls and bow with pink pearls of varying sizes.
Angle Views of My Handmade Girly Pink Birthday Card
 |
| Angle Left - Handmade Girly Pink Birthday Card |
 |
| Angle Right - Handmade Girly Pink Birthday Card |
These views of my card give you an idea of the textures on the front panel.
Inside Panel of My Handmade Girly Pink Birthday Card
 |
| Inside Panel - Handmade Girly Pink Birthday Card |
I decided to leave the inside panel blank. The panel is white cardstock matted with light pink cardstock. I decorated the panel with a strip of swirl embossed light pink cardstock.
I also constructed a handmade envelope from heavy cover stock and elected to leave it unadorned.
Final Handmade Girly Pink Birthday Card and Handmade Envelope Set
 |
| My Handmade Girly Pink Birthday Card and Envelope Set |
I do like the way my card came out, but I think it would be even more girly if I had used the dark pink cardstock for the base card instead of the white. Monochromatic pink would have been very pretty.
Guess I'll have to give the monochromatic idea a shot in a different color.
This card set is available in my Polished Moxie Etsy Shop: Girly Pink Birthday Card.
Card Recipe Specifics for Handmade Girly Pink Birthday Card
- Cardstock: Wausau, The Paper Company, Hammermill, Recollections
- Cover Stock: Staples
- Ribbon: JoAnn Fabrics organdy
- Pearls: unknown
- Tools: Martha Stewart layered arches edge punch, Cuttlebug d'vine swirl embossing folder, scoring board, paper cutter, scissors, Cuttlebug machine, bow easy, computer
- Misc: adhesive
- Techniques: dry embossing, digital stamping
So ends one jaunt along my handcrafting journey with the completion of my handmade girly pink birthday card. A pink birthday card fit for any girly girl or secret diva. Thank you for visiting my blog and allowing me to share my handmade card and pet photography with you. I hope you enjoyed your visit and will come back soon!
Page Content © 2012 Polished Moxie Concepts and Designs


Lovely card...love how you repeated the texture inside! Thank you so much for joining us at MIM this week! Don't forget to leave a comment for another entry, being sure to mention you saw them on Make it Monday, for a chance at our second prize! Good luck,
ReplyDeleteRene :D
P.S. I bow to the queen! Lol!
Such a pretty, girly card!
ReplyDeleteI am popping by from MIM.
~Cheryl~
**Check out my March Blog Candy**
What a lovely pink card!! Great! Thanks for sharing with Speedy Fox and Friends!
ReplyDeleteWhat a pretty pink birthday card! Coming from MIM!
ReplyDeleteThis is a very pretty card. I especially like the dry embossing that you've done. It adds nice texture and also adds to the girly look. Nicely done. Thank you for entering this week's challenge at Card Crafter's Circle.
ReplyDeleteP.S., sorry about your little fur-baby. I hope she will recover soon.
You did a great job again. I'm sure everybody has someone that would appreciate
ReplyDeletea more feminine girly card. Gracie looks like she's enjoying the diva treat-
ment.
Very pretty. Really like the pearl in center of your bow. Thanks for joining speedy Fox and Friends.
ReplyDeleteWhat a really pretty Tent card, thank you for playing along at OSCC & good luck. Janet
ReplyDeletePretty card. I love embossing and the gorgeous ribbon. I am a new follower I would love for you to follow me djchrist71.blogspot.com. Thanks for playing along with us here at Speedy Fox and Friends challenge, we hope to see you again next week. Make sure to check out our challenge with Friends of SpeedyTV for more fun and more chances to win with Mark's Finest Papers, a Heinrich Co.
ReplyDeleteHow pretty, I just love your embossing honey! Thx for linking up to the Make It Monday party!
ReplyDeleteMary J x
This is SUPER cute! Thanks so much for playing along with this week's Ribbon Carousel Challenge!!
ReplyDeleteVery pretty girly card! Love it!
ReplyDeleteMy Blog: http://northernmainescrappygirl.blogspot.com/
How you repeated the texture inside..work well for me..and will use it.Gift Card envelopes.
ReplyDelete