The Making of a "Spread the BOO!" Halloween Card
Card Statistics
- Final Card Size: 5.5" tall x 4.25" wide
- Tools: paper cutter, scissors, Martha Stewart cat punch
, Martha Stewart scalloped edge punch
, Marvy oval punch
, Marvy scalloped oval punch, ruler, Martha Stewart scoring board
, sponge pieces
- Materials: cardstock, scrapbook paper, grosgrain ribbon, ink pads, cover stock
- You can buy this card at my Etsy Shop: Spread the BOO Halloween Card
Card Front
I wanted to make a simple and classy Halloween card so I started by cutting and scoring black cardstock for the card base. This card is scored at the top so that it opens from the bottom. I constructed two separate panels; one panel for the front of the card and one for the inside. When the panels were completed I attached them to the card base.
I started with the front panel. This panel consisted of a deep orange cardstock base layered with gray and orange cardstocks. A section at the top of the panel is the striped paper overlaying a gray lacy scalloped punched border. Grosgrain ribbon is adhered over the top edge of the striped paper and wrapped around the side edges of the panel. This panel is adhered to the front of the black card base.
For the front sentiment, I printed "BOO!" on the deep orange cardstock and punched it out with an oval punch. It is matted on a punched gray cardstock scalloped oval. This sentiment piece is positioned and adhered to the front of the card. A cat silhouette punched from black cardstock is added to the sentiment. To add a touch of class and a little dimension to the card, a snazzy black bow was attached to the ribbon. This completed the front of the card.
Angle View of Card Front to Show Dimension
As you can see, the only true dimension to the card is the little black bow.
Now onward to the inside panel.
Card Inside
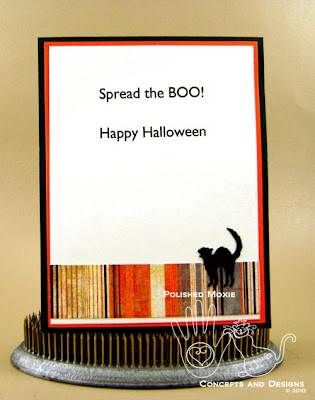
White cardstock has my theme printed on it: "Spread the BOO! Happy Halloween". It is matted on deep orange cardstock and embellished with a strip of the striped paper. A cat silhouette punched from black cardstock was added to tie the whole thing together. The finished panel was adhered to the inside of the card base.
I finished the card off by placing a Polished Moxie logo in coordinating colors on the back of the card.
I also custom made an envelope from scratch to compliment the card. It is made from heavy cover stock and I incorporated the "BOO!" theme. In the lower left hand corner I printed "BOO!" in an orange oval. To add a little depth I sponged a selection of orange and black inks onto the design. The envelope was then lightly sprayed with sealer to make the image more durable for its journey through the postal system.
Final Card and Envelope Combo
I was quite pleased with the way this card ensemble turned out. I also feel that I met my goal to create a card without stamping that was simple, yet Halloweenie with a touch of panache.
My husband's take on the card: "Very Nice." Simply said, kind of like my card.
Purchase this card and envelope ensemble in my Etsy Shop: Spread the BOO Halloween Card
Tidbit of wisdom from the experience: Great ideas can come from talking to your animals.
Card Recipe Specifics
- Cardstock: Wausau, Hammermill
- Cover Stock: Staples
- Striped Paper: Basic Grey
- Punches: Martha Stewart - cat and scalloped border; Marvy - oval and scalloped oval
- Grosgrain Ribbon: Michaels
- Ink: Colorbox
Thank you for visiting and I hope you come back soon!
Page Content © 2010 Polished Moxie Concepts and Designs


No comments:
Post a Comment
Thank you for taking the time to leave a comment. I welcome and appreciate all comments.