 |
| Portion of Evergreen Trees Christmas Card |
Besides my two Christmas cards, I also have a short video that I put together. This is the video my critter cam captured of the big oak tree branch falling during our October surprise snowstorm. In the beginning you can see debris falling around my bird feeders (I increased the speed on this part so that we don't sit through 2 minutes of falling bark and leaves). Next you'll see a whoosh of snow and then the branch (half of our oak tree) comes down hitting my bird feeders and knocking half of them off. If you watch closely, to the right of the screen as the tree falls you will see a little bird fly out of the falling tree and then go back into the branches after the tree settles. The video was captured after dark via infrared and there is no audio.
Handcrafting My Evergreen Trees Christmas Cards
Card Statistics
- Final Card Sizes: 5.5" tall x 4.25" wide
- Tools: tree stamps, star stamp, tag die, deckled rectangle die, die for image shape, scoring board, paper cutter, heat tool, sponge pieces, cuttlebug machine, computer, scissors, anti-static bag, blending tool, ruler
- Materials: ink, embossing powder, stickles, embossing ink pen, adhesive, ribbon, white acrylic paint, rhinestones, spray sealer
- Both Cards are Available in My Polished Moxie Etsy Shop: Joy Evergreen Trees Christmas Card and Noel Evergreen Trees Christmas Card
Front Views of Handmade Evergreen Trees Christmas Cards
 |
| Joy Evergreen Trees Christmas Card |
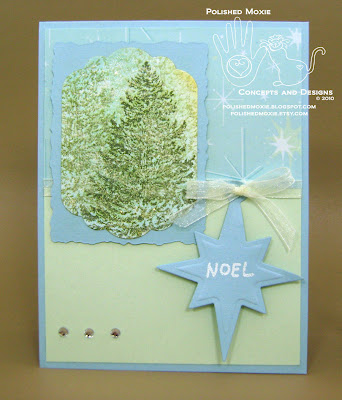
I created my evergreen trees Christmas card by first cutting and scoring my card base. I selected a pale blue cardstock and scored it so that the card opens vertically from the bottom. Next I created a panel by cutting a piece of pale mint green cardstock and layering the top of it with a pretty pale blue printer paper with Christmas stars on it. I affixed a piece of cream organdy ribbon (without a bow) over the paper and cardstock interface by wrapping the ribbon ends around to the back of the cardstock panel and securing them. I did not attach the ribbon along the interface on the front of the card because I wanted to be able to tie a bow around it to hang my tag. Once the ribbon was secured I glued the panel to my card base.
For my card image I sponged and blended a background on a piece of white cardstock that was slightly larger than my final image so that I could die cut it to shape. On this card I used several blue and pale green inks to create the majority of the background and then added a little brown for the forest ground. After the background dried I inked up my tree stamp with green ink and stamped it several times on the background without re-inking it. When I stamped I overlapped several of the trees. This is how I achieved a look of distant trees. I die cut my image into the shape shown.
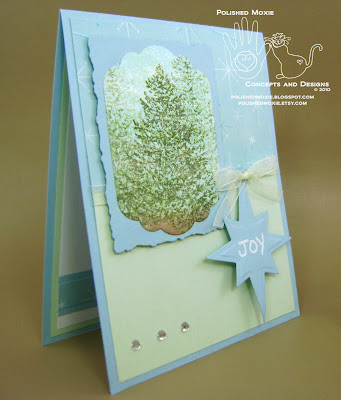
To add more interest to my image I lightly sponged on white acrylic paint to represent falling snow. I wanted the snow to glisten like it does in nature so I sponged on some stickles over the image. The combination of the acrylic paint and the stickles results in an interesting texture and a glistening snow when moving the image. To complete my image panel I matted it with pale blue cardstock die cut with a decked edge. I affixed the completed image panel to my card with silicone adhesive so that it was popped from the surface of the card.
For adornment I die cut a Christmas star tag from pale blue cardstock. Using an embossing ink pen I printed "Joy" on the tag and heat embossed it with white embossing powder. To prevent stray embossing powder flakes I wiped the tag with my anti-static bag before using my embossing pen. I attached my tag to the ribbon with a bow made from the same organdy ribbon. I also added a small dab of gel glue under the bow to secure everything in place and prevent the tag from dragging. As a finishing touch I added a little bling by adhering three diamond-like rhinestones.
My second evergreen trees Christmas card is made identically to the first with just a couple of subtle differences. For the image I did not sponge any brown ink on the background and I used a slightly different mix of colors including yellow. Also, I printed "NOEL" on the Christmas star tag.
 |
| Noel Evergreen Trees Christmas Card |
Angle Views of Handmade Evergreen Trees Christmas Cards
There are several elements on my cards that give them dimension: the raised image panel, hanging Christmas star tag, bow and rhinestones. Here are pictures of both cards so that you can check out their dimensional elements.
 |
| Right Angle View of Joy Evergreen Trees Christmas Card |
 |
| Left Angle View of Joy Evergreen Trees Christmas Card |
 |
| Right Angle View of Noel Evergreen Trees Christmas Card |
 |
| Left Angle View of Noel Evergreen Trees Christmas Card |
The sparkle on the images was difficult to capture in a picture, but it is very evident when you move the cards in the light.
Inside Panels of Handmade Evergreen Trees Christmas Cards
 |
| Inside of Joy Evergreen Trees Christmas Card |
I wanted the inside panel of my Christmas cards to be simple in construction and contain a greeting reflective of the feelings I hoped the front of my cards would evoke. For my first Christmas card I printed "May the quiet beauty of the holiday season bring you joy" in pale blue ink on white cardstock. I embellished the card panel with layered strips of the pale blue cardstock and printed paper. To complete the panel I matted it with pale mint green cardstock.
The internal design for my second Christmas card is identical to the first. My greeting for this card is "Wishing you all the wonder and beauty of the holiday season" and it too is printed in pale blue ink.
 |
| Inside of Noel Evergreen Trees Christmas Card |
I constructed handmade envelopes to compliment each of my Christmas cards. I decorated each by stamping a pair of evergreen trees in the lower left corner. Above the trees I stamped a Christmas star. To protect the image through the mail system I sprayed it with sealer.
Final Handmade Evergreen Trees Christmas Card and Envelope Ensembles
 |
| Joy Evergreen Trees Christmas Card Set |
 |
| Noel Evergreen Trees Christmas Card Set |
Two card sets the same yet different.
Both of these Christmas card sets are available in my Polished Moxie Etsy Shop: Joy Evergreen Trees Christmas Card and Noel Evergreen Trees Christmas Card
Card Recipe Specifics
- Cardstock: Wausau, Hammermill
- Scrapbook Paper: Dena Colorbok
- Cover Stock: Staples
- Dies: Shapeabilities holiday tags, Nestabilities labels 11 and deckled rectangles large
- Stamps: trees on card and envelope from Inkadinkado, Christmas star on envelope from Fiskars
- Ribbon: Joann Stores
- Inks: yellows, blues, and pale green are Colorbox pigments; brown and blues are Colorbox fluid chalks, greens for trees are Tim Holtz distress inks; Zig embossing ink pen
- Embossing Powder: Stamp 'n Stuff opaque detail white
- Stickles: frosty lace
- Acrylic Paint: Adirondack snow cap dabber
- Rhinestones: Studio G
- Tools: Martha Stewart scoring board, Making Memories paper cutter, Darice heat tool, Ranger blending tool, anti-static bag, cuttlebug machine, sponge pieces, scissors, ruler
- Misc: adhesives (YES, silicone, gel), spray sealer
- Techniques: stamping, die cutting, heat embossing, sponging
Thank you for visiting my blog and allowing me to share my handcrafted items with you. I hope you enjoyed your visit and will come back soon!
Page Content © 2011 Polished Moxie Concepts and Designs


Your evergreen Christmas tree cards are just gorgeous! Wishing you a very Merry Christmas and a Happy New Year!
ReplyDeleteit just look beautiful...you design Gift Card envelopes for it like it..thanks for sharing.
ReplyDelete