 |
| Portion of image on my Red Snowy Trees Christmas Card |
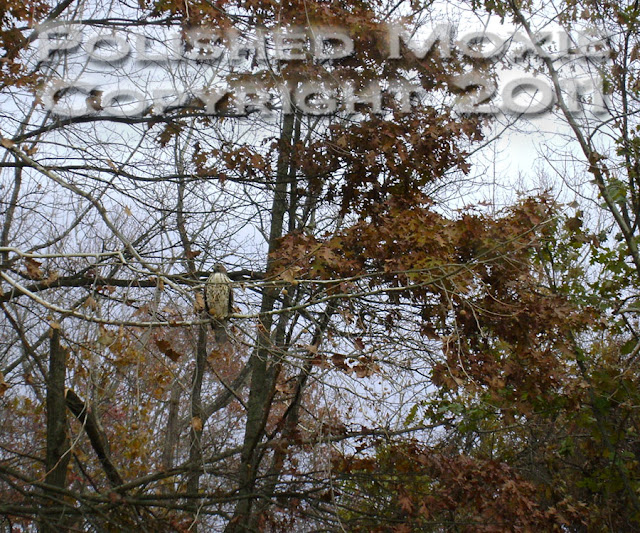
I also want to share a few pictures of a visitor that I had a few days after our October surprise snowstorm. I looked out my window while working on my computer and saw him land on the branch and begin surveying my garden.
 |
| Hawk sitting on tree branch |
Do you see him sitting on that little branch near the center of the picture?
 |
| Hawk perched on tree branch over garden |
Here's a closer picture of him. He's a new hawk for me. I've not seen one like him before in our backyard.
 |
| Hawk sitting on tree branch surveying his surroundings |
As you can see he is really looking around our garden. His head was turning back and forth taking everything in. He's sitting on a branch not too far away from my bird feeders.
 |
| Close up of Hawk |
Beautiful guy isn't he!
Handcrafting My Snowy Trees Christmas Cards
Card Statistics
- Final Card Sizes: 5.5" tall x 4.25" wide
- Tools: tree stamps, tag die, scoring board, paper cutter, scissors, ruler, ink blending tool, heat gun, cuttlebug machine, anti-static bag, computer.
- Materials: embossing powder, embossing ink pen, ink, gel pen, cardstock, cover stock, ribbon, adhesive, acrylic paint, spray sealer
- Both Cards are Available in My Polished Moxie Etsy Shop: Red Snowy Trees Christmas Card and Green Snowy Trees Christmas Card
Front Views of Handmade Snowy Trees Christmas Cards
 |
| Handmade Red Snowy Trees Christmas Card |
To begin my handmade red snowy trees Christmas card I cut and scored cranberry red cardstock for my base card so that my card opens vertically from the bottom.
For my card image I used an Adirondack acrylic paint dabber to ink up my tree stamp with white acrylic paint. I stamped one tree on white cardstock, then primed the stamp again with acrylic paint and stamped the other tree slightly offset from the first tree. When the paint was completely dry I used a blending tool to rub first light pink and then cranberry ink all over the image panel. The trees turned a pale pink color against a cranberry red background. They also have a texture to them that has an interesting embossed feel and look to it. This is an acrylic paint resist technique.
I matted the image panel with a pale pink cardstock that matched the trees and added a pale pink piece of organdy ribbon (without the bow) down the left side before affixing the panel to my card base.
For adornment I die cut two ornament tags (one from cranberry cardstock and one from pale pink cardstock). Using an embossing ink pen I printed "JOY" and "NOEL" on the tags and heat embossed them with gold embossing powder. To prevent stray embossing powder flakes I wiped the ornament tags with my anti-static bag before using my embossing pen. I attached the two ornaments to the ribbon with a bow made from the same organdy ribbon. I also added a small dab of gel glue under the bow to secure everything in place and prevent the ornament tags from sliding down the ribbon. This completed the front of my red snowy trees Christmas card.
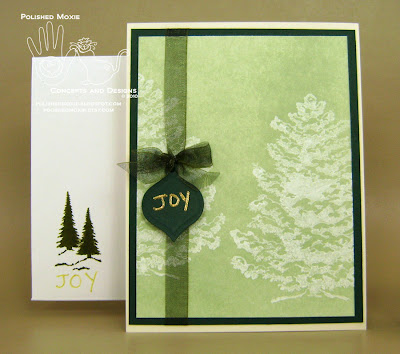
My green snowy trees Christmas card has a cream card base and evergreen cardstock image mat. It was constructed in the same manner as my red snowy trees Christmas card except that I used white glossy cardstock for the image panel and both a dye and distress ink on my blending tool. I also only used one ornament tag.
 |
| Handmade Green Snowy Trees Christmas Card |
Angle Views of Handmade Snowy Trees Christmas Cards
The only dimension on my snowy trees Christmas cards is the slight texture of the trees and the hanging ornament tags. Here are pictures of them so that you can check out their dimensional elements.
 |
| Right Angle View of Handmade Red Snowy Trees Christmas Card |
 |
| Left Angle View of Handmade Red Snowy Trees Christmas Card |
 |
| Right Angle View of Handmade Green Snowy Trees Christmas Card |
 |
| Left Angle View of Handmade Green Snowy Trees Christmas Card |
Inside panels of Handmade Snowy Trees Christmas Cards
 |
| Inside Handmade Red Snowy Trees Christmas Card |
I elected to keep the greetings on the inside of my two Christmas cards simple. For my red snowy trees Christmas card I printed "Happy Holidays" in cranberry ink on white cardstock. To embellish the card panel I layered strips of the pale pink and cranberry red cardstocks, and then positioned them near the bottom of the panel. I matted the completed panel on pale pink cardstock.
Here's a tip for how I get the color of my printed greeting to match my card base. I scan a piece of the cranberry red cardstock into my computer and select it as the color for my text in Photoshop Elements.
The internal design for my green snowy trees Christmas card is very similar to my red card although I used a different greeting. I printed "Wishing you joy during the holiday season" in evergreen ink on cream cardstock to reflect the "JOY" on the front ornament tag. You'll also note that the top layer of my embellishment strip is patterned. I actually used a strip of my front card panel that I had cut when sizing the panel for my card. It contains part of the acrylic paint stamp and gives a little more character to the embellishment. I thought this was a good use for my scrap as opposed to the trash can (well actually the recycle bin in my house).
 |
| Inside Handmade Green Snowy Trees Christmas Card |
As is my practice, I also constructed handmade envelopes to compliment each of my Christmas cards. I decorated each by stamping a pair of evergreen trees in their respective colors in the lower left corner. Below the evergreens I printed the word "JOY" using a yellow gold gel pen. To protect the images during mailing I sprayed them with sealer.
Final Handmade Snowy Trees Christmas Card and Envelope Ensembles
 |
| Handmade Red Snowy Trees Christmas Card Set |
 |
| Handmade Green Snowy Trees Christmas Card Set |
So there you have it...my two handmade snowy trees Christmas cards and coordinating envelopes...each with its own persona.
Both of these Christmas card sets are available in my Polished Moxie Etsy Shop: Red Snowy Trees Christmas Card and Green Snowy Trees Christmas Card.
Card Recipe Specifics for Red Snowy Trees Christmas Card
- Cardstock: The Paper Company, Wausau
- Cover Stock: Staples
- Die: Shapeabilities holiday tags
- Stamps: Both from Inkadinkado
- Inks: Adirondack earthtones cranberry and lights shell pink, Zig embossing ink pen, Gelly Roll yellow gold gel pen
- Embossing Powder: Stamp 'n Stuff opaque detail gold
- Acrylic Paint: Adirondack snow cap dabber
- Ribbon: JoAnn Stores organdy
- Tools: Martha Stewart scoring board, Making Memories paper cutter, Ranger blending tool, anti-static bag, Darice heat tool, Cuttlebug machine, scissors, ruler, computer
- Misc: YES adhesive, gel adhesive, spray sealer
- Techniques: acrylic paint resist, stamping, die cutting, heat embossing
Card Recipe Specifics for Green Snowy Trees Christmas Card
- Cardstock: The Paper Company, Wausau, Ocean State (glossy)
- Cover Stock: Staples
- Die: Shapeabilities holiday tags
- Stamps: Both from Inkadinkado
- Inks: Adirondack lights juniper, Tim Holtz Distress forest moss, Zig embossing ink pen, Gelly Roll yellow gold gel pen
- Embossing Powder: Stamp 'n Stuff opaque detail gold
- Acrylic Paint: Adirondack snow cap dabber
- Ribbon: Wrights Prestige organdy
- Tools: Martha Stewart scoring board, Making Memories paper cutter, Ranger blending tool, anti-static bag, Darice heat tool, Cuttlebug machine, scissors, ruler, computer
- Misc: YES adhesive, gel adhesive, spray sealer
- Techniques: acrylic paint resist, stamping, die cutting, heat embossing
Thank you for visiting my blog and allowing me to share my handcrafted items with you. I hope you enjoyed your visit and will come back soon!
Page Content © 2011 Polished Moxie Concepts and Designs


Your snowy tree cards are both so beautiful and elegant! I really can't decide which one I like better. Wonderful picture of your hawk. I don't see too many where I live. Have a wonderful weekend!
ReplyDelete