Showing posts with label fussy cut. Show all posts

Wednesday, March 6, 2013

Handmade Whimsical Owl Card - Hoo Loves Ya Baby - Backyard Bird of Prey


Picture of a portion of my handmade owl card with an owl poem.
Peek at My Handmade Owl Card


Today I heard an owl in the early morning hours so I thought I would share a handmade owl card with you. Although I truly love these little creatures, this is the first owl card I have made. My handmade owl card is very whimsical in colors of pink, kraft and blue. I adorned it with ribbon and a pink heart button to add that touch of panache. I decided to use the sentiment "Hoo loves ya baby?" because it makes me smile and is such a wonderful play on words. The owl image I selected for my card fits my sentiment since the little owl has out-stretched wings as if to ask the question "Hoo loves ya baby?"


Inspiration for My Handmade Owl Card


Like many people I have a fascination with owls. They are so cute and appear to have a lot of personality with their big expressive eyes. Growing up I spent a lot of time on my Grandparent's farm and there was a little barn owl that lived in a tree near the house for many years. My Grandmother called him "Rusty" and you could hear him calling during the night and early morning hours. Little Rusty was the inspiration for my owl card and my Grandmother absolutely loved him (I often heard her talking about him with great affection).

These days I have my own owl. Although I have not seen him "in person", I have seen him at night on my night vision video camera when he swoops down near our bird feeders during his hunting expeditions. Sometimes I see him landing on the ground or in our gardens. We also have heard him in the early morning hours just before dawn. I have the feeling that my handmade love you owl card is just the first of many.

Now this is the first owl card I have made, but it is not my first "Love" card. A few other posts of my cards for romance include: Tattoo Art Love You card, I Love You Teddy Bear Card, You Float My Boat card, Perfect for Me card, Robots in Love cards, and I Love You Always card.


The World Around Me


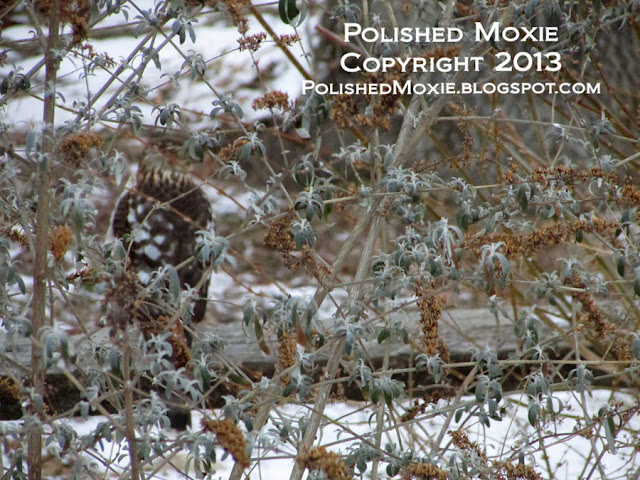
As I mentioned, I haven't seen my owl, but I have seen many other birds of prey during the day in my backyard. They seem to think that I put bird food out just to attract their lunch for them. Here is one of my sneaky hawks sitting on my garden fence. He's behind the butterfly bush.


Picture of hawk on garden fence.
Hawk Perched on Garden Fence Looking for Lunch


Here's a closer look at him via my zoom.


Picture with closer view of hawk on garden fence.
Hawk Perched on Garden Fence


Picture of hawk in profile sitting on fence.
Hawk on Perched on Garden Fence in Profile


Picture of hawk wiping beak on fence.
Hawk Wiping Beak on Garden Fence


My Love of Papercrafting Challenges


I follow many challenge blogs and my handmade owl card reflects the following challenges:


Handcrafting My Handmade Owl Card


Card Statistics


  • Final Card Size: 5.5" tall x 4.25" wide
  • Tools: scalloped heart die, owl stamp, computer, blending stumps, scoring board, paper cutter, Cuttlebug machine, bow easy, non stick craft mat, tape runner, ruler, scissors, detail scissors, sponge pieces
  • Materials: cardstock, designer paper, cover stock, ribbon, silicon adhesive, tape adhesive, gel adhesive, colored pencils, ink, spray sealer, button, jute, gamsol
  • Card can be Purchased in My Polished Moxie Etsy Shop: Handmade Love You Owl Card


Front Panel of My Handmade Owl Card


Picture of the front of my handmade owl card facing right.
Angle Right - My Handmade Owl Card


I used kraft cardstock (4.25" x 11") for the base of my handmade owl card. I scored the cardstock at 5.5" so that my card opens vertically from the bottom to form a tent card.

For my front card panel I started with a piece of pastel pink cardstock (4" x 5.25"). The first thing I did was determine the placement of my sentiment and then printed "Hoo Loves Ya Baby?" in brown ink on it using my computer. Once my sentiment was in place, I affixed a piece of striped designer paper (4" x 2") on the lower portion of the pink cardstock panel.

To add a little panache to my owl card I attached a ribbon across the interface of the striped paper and cardstock (5"). I wrapped the ends of the ribbon around the edges of my panel and secured them on the back. Once the ribbon was in place I affixed the panel to my card base using my tape runner.

For the focal point of my card I stamped my owl on kraft cardstock and colored him using gamsol and colored pencils. When I finished coloring him I fussy cut him out (he's about 1" tall x 1.25" wide). Next I die cut a scalloped heart (1.75" wide x 1.5" tall) from kraft cardstock. Leaving the die in place on the heart, I sponged pink ink on the heart. When I removed the die, it left a nice kraft border around my heart.

After completing my owl and heart, I positioned them on my card front and affixed them with silicon adhesive so that they are popped up from the surface. I like the added dimension they give my card.


Picture of the completed image on my handmade owl card.
Close up View of the Image on My Handmade Owl Card


To finish off my card front I added a bow and heart button. I used a piece of jute on the button and attached it to the center of my bow. Using gel adhesive, I attached the bow to the card front on the ribbon.


Picture of the front of my handmade owl card facing left.
Angle Left - My Handmade Owl Card


You can see the nice dimension that the bow and popped elements add to my owl card. I find it simple, but also interesting.


Inside Panel of My Handmade Owl Card


Picture of the inside panel of my handmade owl card.
Inside Panel - My Handmade Owl Card


I kept the inside panel of my owl card very clean and simple. I cut a piece of white cardstock (3.75" x 5") and matted it with pastel pink cardstock (4" x 5.25"). For a little decoration I affixed a strip of the striped designer paper. I attached my completed inside panel to my kraft card base using my tape runner.

I also constructed an envelope from heavy cover stock (8.5" x 8.5"). As decoration on my envelope I stamped an owl in the lower left corner and colored him to match the owl on my card. I sprayed my colored image with sealer to protect it in the mail.


Final Handmade Owl Card and Handmade Envelope Set


Picture of my handmade owl card and coordinating envelope.
My Handmade Owl Card and Handmade Envelope Set


My finished project is a whimsical owl card with a smile maker of a sentiment. I really like this card.

This card set is available in my Polished Moxie Etsy Shop: Handmade Love You Owl Card.


Card Recipe Specifics for My Handmade Owl Card


  • Cardstock: The Paper Company, Wausau
  • Designer Paper: Paper Essentials
  • Cover Stock: Staples
  • Ribbon: Michaels
  • Owl Stamp: Hampton Art
  • Die: Spellbinders Nestabilities classic scalloped heart
  • Ink: Stazon jet black, Colorbox pigment pink
  • Prismacolor Pencils: sunburst yellow, dark umber, pink, peach beige, blush pink, powder blue, blue slate
  • Tools: tape runner, Cuttlebug machine, scoring board, paper cutter, ruler, blending stumps, scissors, sponge pieces, detail scissors, computer, bow easy, non stick craft mat
  • Misc. Materials: gel adhesive, silicon adhesive, tape adhesive, gamsol, jute, heart button
  • Techniques Used: gamsol, die cutting, fussy cutting, stamping, digital stamping, stenciling, sponging


So ends another jaunt along my handcrafting card journey with my handmade owl card. A unique hooter card perfect for a lighthearted "I Love You.". Thank you for visiting my blog and allowing me to share my handmade card and photography with you. I hope you enjoyed your visit and will come back soon! 

Don't forget to show a little "Moxie" love and hit the Polished Moxie like button on my sidebar or to the right of the Polished Moxie logo below :)

Picture of the Polished Moxie Logo


Page Content © 2013 Polished Moxie Concepts and Designs


Wednesday, October 10, 2012

Humorous Handmade Dog Frankenstein Halloween Card - Witty Halloween Hello


Image of a portion of my handmade Frankenstein Dog Halloween card
Peek at My Handmade Dog Frankenstein Halloween Card
I'm more into the whimsical or humorous Halloween cards. When I browse the cards in a store I always seem to reach for the cute or funny Halloween cards as opposed to the scary and gory ones. So it makes sense that my handmade Halloween cards would lean toward the whimsical and humorous side. The homemade Halloween card I am going to share today falls into that category. I also enjoy spoof movies like "Young Frankenstein" and crazy old music like "Monster Mash". I've also incorporated these two interests into my funny Halloween card. It features a cute little dog dressed up like Frankenstein patiently waiting to accompany his master on their trek for Halloween candy and a dance party afterwards. Behind him is a full moon with a trio of bats profiled in its light. The bats are as scary as this Halloween card gets. The inside message "Got Candy?" in its eerie script is a smile maker.

If you browse through the posts of my other handmade Halloween cards you will see that the majority of them are cute and whimsical with a touch of humor in some form.


Skip photography and challenge list and go directly to the detailed handmade card information.


The World Around Me


As I sit here typing up this post I can hear gentle snoring behind me. Since I have returned home Bingo and Gracie (my two cats) seem to follow me everywhere. It's like I have two shadows wherever I go. While I was taking pictures of some of the cards I have made, Gracie followed me down to my craft area and sat next to a chair full of stuff and began meowing. This was my cue to empty the chair and put her fleece in it so that she could keep me company while I photographed my cards. I captured a couple of pictures of her in the chair.

Photo of my cat Gracie sleeping in a chair.
My Cat Gracie Keeping Me Company

Photo closeup of my cat Gracie sleeping in a chair.
Gracie Patiently Waiting for Me to Complete My Photography

Obviously her fleece is too big for that particular chair, but she stayed there for over an hour keeping me company.


My Love of Papercrafting Challenges


I follow many challenge blogs and my handmade Frankenstein Dog Halloween card reflects the following challenges: 
  • Moving Along with the Times challenge is "in the dark". My card reflects this challenge with its black coloration and its night atmosphere.
  • Pixie Dust Studio challenge is "anything goes". My Frankenstein Dog Halloween card fits this challenge.
  • Crafty Ann's Challenge requires a project inspired by a film and my Frankenstein Dog card used the film "Young Frankenstein" for inspiration. I spoofed Frankenstein with a cute dog imitating Frankenstein.
  • Stamping with the Dragon challenge is "animals". My card has a cute little dog on it.
  • Crazy 4 Challenges is to incorporate a favorite Halloween character. One of my favorite Halloween characters is Frankenstein and the dog on my Halloween card is dressed like Frankenstein.
  • Totally Gorjuss challenge is "anything goes". My Dog Frankenstein Halloween card fits this challenge.
  • The Corrosive Challenge is to create a Halloween project featuring a villain or monster. Frankenstein fits this description and the dog on my card is dressed like Frankenstein and is the focus of my Halloween card.
  • Di's Digi Design Challenge is to use an animal acting like a human. The dog dressed like Frankenstein on my funny Halloween card fits this description.
  • Robyn's Fetish Challenge is "circles". My Frankenstein Dog Halloween card has incorporated several circles in its design.
  • Clear It Out challenge is an anything goes using orange, purple or black as the dominate color. Frankenstein Dog card is predominately black.
  • Oldie But A Goodie Challenge is to create a project inspired by a song and use something at least 6 months old. The quirky song "Monster Mash" was part of the inspiration for my Dog Frankenstein Halloween card and I used black cardstock from my stash that is more than 6 months old.
  • Papertake Weekly Challenge is "all creatures great and small". Frankenstein dog on my handmade Halloween card is a creature.
  • Crafting for all Seasons challenge is "costumes/dressing up". The dog on my Halloween card is dressed up like Frankenstein.
  • The Poodles Parlour theme is Halloween and my Frankenstein Dog is a Halloween card.
  • Just Some Lines challenge is a cute Halloween card. I think the whimsical dog dressed up like Frankenstein on my Halloween card is definitely cute.


Handcrafting My Handmade Frankenstein Dog Halloween Card


Card Statistics

  • Final Card Size: 5.5" tall x 4.25" wide
  • Tools: dog stamp, scoring board, paper cutter, scissors, ruler, blending stumps, sponge pieces, computer, circle cutter, bat punch, Cuttlebug machine
  • Materials: cardstock, cover stock, colored pencils, gamsol, spray sealer, inks, adhesive
  • Card can be Purchased in My Polished Moxie Etsy Shop: Handmade Frankenstein Dog Halloween Card


Front Panel of My Handmade Frankenstein Dog Halloween Card


Image of the front of my handmade Frankenstein Dog Halloween card sitting at a right angle
Front Right - My Handmade Frankenstein Dog Halloween Card

To create my Frankenstein Dog Halloween card I stamped the dog image on white cardstock and colored him using gamsol and colored pencils. Once the image was colored, I fussy cut him out and set him aside.

Next I created my card base from red cardstock and scored it at the top to form a tent card that opens vertically from the bottom. I then created my topper and inside panels to affix to my red card base.

For my topper panel I used black cardstock. As a backdrop for my dog image I matted a black cardstock circle with a red cardstock circle. To add some depth I sponged red ink on the black circle and then glued my dog image to it. 

I cut a yellow cardstock circle to represent the moon and sponged it with a darker yellow to add crater like features to it. I affixed the moon to my black panel and then popped on my round dog panel so that it is slightly off the surface. As a finishing touch I popped a trio of bats onto the moon. I attached the completed topper to my red card base.

Here's another picture of my Frankenstein Dog Halloween card from a different angle.

Image of the front of my handmade Frankenstein Dog Halloween card sitting at a left angle
Front Left - My Handmade Dog Frankenstein Halloween Card

In this photo you can see the dimension added by the popped elements. You can also see the sponged red around my dog. The sponging on the moon is not so clear.


Inside Panel of My Handmade Frankenstein Dog Halloween Card


Image of the inside of my handmade Frankenstein Dog Halloween card
Inside Panel - My Dog Frankenstein Halloween Card

For the inside panel of my Halloween card I printed "Got Candy?" on white cardstock that I decorated with a yellow cardstock moon in the lower right corner. I also popped a trio of bats on the moon. To finish the panel I matted it with black cardstock and then affixed the completed panel to my red card base.

I also constructed a handmade envelope from heavy cover stock. I stamped the dog image in the lower left corner and colored it using gamsol and colored pencils. I sponged ink around my image and then sprayed it with a matte sealer. The sealer protects the envelope image should it travel through the mail system.


Final Handmade Frankenstein Dog Halloween Card and Handmade Envelope Set


Image of my handmade Frankenstein Dog Halloween card and envelope set
My Handmade Dog Frankenstein Halloween Card and Handmade Envelope Set

I smile every time I see this costumed dog. I think he is so cute and is truly the focus for this card.

This card set is available in my Polished Moxie Etsy Shop: Frankenstein Dog Halloween Card.


Card Recipe Specifics for Handmade Frankenstein Dog Halloween Card

  • Cardstock: Wausau, Embassy, Recollections, The Paper Company
  • Cover Stock: Staples
  • Stamp: Inkadinkado
  • Punch: Fiskars (bats)
  • Dies: Nestabilities standard circles large and small
  • Inks: Colorbox, Stazon black
  • Prismacolor Pencils: goldenrod, jasmine, canary yellow, apple green, olive green, crimson red, metallic silver
  • Tools: scoring board, paper cutter, scissors, ruler, blending stumps, sponge pieces, computer, Cuttlebug machine
  • Misc Materials: adhesive, spray sealer, gamsol
  • Techniques Used: gamsol, sponging, stamping, die cutting, fussy cutting


So ends another jaunt along my handcrafting card journey with my handmade Frankenstein Dog Halloween card. A unique card for expressing a witty Halloween hello. Thank you for visiting my blog and allowing me to share my handmade Dog Frankenstein Halloween card and photography with you. I hope you enjoyed your visit and will come back soon! 

Don't forget to show a little "Moxie" love and hit the Polished Moxie like button on my sidebar or to the right of the Polished Moxie logo below :)

Picture of the Polished Moxie Logo


Page Content © 2012 Polished Moxie Concepts and Designs


Back to top of post
Back to challenge list
Back to front card panel
Back to inside card panel


Monday, March 19, 2012

Handmade Monochromatic Blue Missing You Cat Card & One Poor Little Mouser


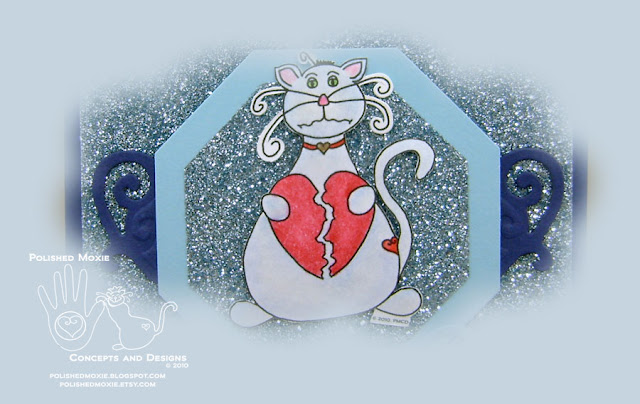
Section of the image on my missing you cat card in blue.
Portion of monochromatic blue missing you cat card
Blue without you. That's the theme of my handmade monochromatic blue Missing You Cat Card. Now I say cat, but this is a very special cat. She's my own creation and her name is Moxie the Feline. Today she has a broken heart and is very blue because she's missing someone in her life who has returned home after a brief visit with her. And because Moxie is a feline (somewhat of a diva in my opinion) and not just any ordinary cat, her handmade missing you card had to be special and have a little glitz. I've used a monochromatic blue color scheme befitting the occasion and upcycled some very sparkly wrapping paper that met with Moxie's approval. I wanted this missing you cat card to have dimension along with character so I used several layers and some interesting shapes on it. Very suitable for my feline diva digital image.

Speaking of feline divas...I have another one on my hands and she's no digital creation. Poor Gracie (my grey queen of the house) for the past 6 weeks she has had to put up with a fashion accessory that does not meet her approval, although I happen to think she looks good in green.

My cat Gracie in her new fabric fashion accessory.
Cat Gracie sporting her new fashion accessory

Doesn't she look miffed?!! She scraped her right rear leg on something and her constant licking with that sandpaper tongue of hers caused it to get red and inflamed. After a trip to the vet, two shots and a daily ointment for her scrape, insult was added to injury when she was adorned with this lovely green fabric collar to prevent her from getting to her leg. When we got home I'm not sure who was more entertaining to watch...Gracie trying to maneuver in her contraption or Bingo (my other cat) trying to figure out what the heck was going on with Gracie.

Poor Bingo has followed Gracie around like a poor lost soul. He has been bringing her toys and hasn't been tormenting her like he normally does. I think they'll both be glad when the collar comes off and things can get back to normal.

My cat Bingo watching with interest as my other cat Gracie maneuvers in her collar.
Cats Bingo and Gracie with Bingo feeling sorry for Gracie

It's pretty funny how they act around one another right now. Bingo wants to comfort Gracie, but knows to give her space when she's in one of those moods.

My two cats sleeping on a make-shift window seat.
Cats Bingo and Gracie relaxing on their perch

Notice on their make-shift window seat that Bingo wants to be up with Gracie, but has given her plenty of room to the point that he's almost off the edge of their platform. This is how it has been around my house for the last several weeks.

One thing is for certain...

My cat Gracie eating from her bowl with her collar in place.
Absolutely nothing prevents cat Gracie from eating

...nothing prevents Gracie from eating. I have been finding kibbles everywhere though. It seems that when she eats dry food, as she's crunching away the crumbs drop into her collar and when she moves her head she flings the collected crumbs across the floor. Thank goodness for vacuums. Oh well, we'll be able to take the collar off this soon and hopefully she'll leave her leg alone since it has healed up pretty nicely.


My Love of Papercrafting  Challenges

I love looking at challenge blogs and using them to assist me in developing my cards. My monochromatic blue missing you cat card reflects the following challenges:
  • City Crafter Challenge to focus on things in your heart and right now my poor cat and missing my family half way across the U.S. are both in my heart at this time.
  • Shelly's Images to show what you've got (anything goes).
  • Delightful Challenges to make a project for someone special and my card fits since its for that person that you're missing like crazy.
  • The Squirrel and the Fox to create something inspired by love. I love my cats, my digital images, and my family that live so far away.
  • Chocolate Coffee and Cards feathers and fur to incorporate an animal on your creation. Well, my digital image Moxie is a cat (even if she doesn't think so).
  • Cardmadfairy's Digi Days to add a sentiment and my sentiment "Blue Without You" is digital and affixed below my digital Moxie the feline image.
  • Forever Friends with a 3D or/& decoupage. My dimensional missing you cat card features my digital cat image and has several popped layers.


Handcrafting My Monochromatic Blue Missing You Cat Card


Card Statistics
  • Final Card Size: 5.5" tall x 4.25" wide
  • Tools: octagon die, tag die, heart border die, scoring board, paper cutter, scissors, ruler, blending stumps, computer, Cuttlebug machine, piercing needle tool, exacto knife, embossing tool
  • Digital Stamp: Moxie has a Broken Heart can be purchased in My Polished Moxie Etsy Shop
  • Materials: cardstock, glitter wrapping paper, cover stock, adhesives, gamsol, colored pencils, spray sealer, brads
  • Card can be Purchased in My Polished Moxie Etsy Shop: Missing You Cat Card


Front View of My Handmade Monochromatic Blue Missing You Cat Card

Front of my missing you cat card in blue.
Handmade Monochromatic Blue Missing You Cat Card

The inspiration for my card was the glittery Christmas paper that I received on several of my presents and decided to save for my future crafting delight. I also wanted to use my Moxie has a broken heart digital image. Looking through my Spellbinders dies I pulled out a few and created a sketch for my handmade card. I used the octagon die as the starting point for my sketch and went from there.

For the base of my card I used navy blue cardstock and scored it across the top so that my missing you cat card opens vertically from the bottom. Since I had decided to make the card monochromatic based upon my sparkly paper, I used a light blue cardstock for the base of my front panel. I layered it with an octagonal piece of the upcycled glittery paper to resemble the die cuts to be used in my image panel.

I created my image panel by starting with light blue cardstock die cut into an octagon and layering it with an octagon of the glittery paper. Based upon this panel I sized my Moxie digital stamp and printed it out on white cardstock. I colored Moxie using gamsol and colored pencils. You'll notice that Moxie has a blue tint befitting the mood of my card and its sentiment. After coloring Moxie I fussy cut her out and used a ball stylus to give her a more dimensional and rounded look. I used silicon adhesive to pop her off the surface of the octagon panel. 

With my image panel completed I popped a couple of die cut scrolled hearts on to the front panel and then popped my image panel on top of them so that they peek out from beneath it. This added a lot of depth to my card. I printed my sentiment "Blue Without You" on light blue cardstock in blue ink and die cut it out. To finish off my front card panel I attached the sentiment tag with silver brads over the image panel by piercing two holes through all the layers with a piercing tool. I affixed the completed front panel to my card base.


Angle Views of My Handmade Monochromatic Blue Missing You Cat Card

Front of my missing you cat card in blue sitting at a left angle.
Left Angle View of Monochromatic Blue Missing You Cat Card

Front of my missing you cat card in blue sitting at a right angle.
Right Angle View of Monochromatic Blue Missing You Cat Card

These views of the front of my card give you an idea of the dimensional elements. You can also see the added dimension I obtained on Moxie by using the ball stylus.


Inside Panel of My Handmade Monochromatic Blue Missing You Cat Card

Inside panel of my missing you cat card in blue.
Inside Panel of Monochromatic Blue Missing You Cat Card

I elected to leave the inside of my card blank. The panel base is light blue cardstock that I layered with white cardstock and embellished with die cut scrolled hearts. A very clean and simple design that is in direct contrast to the sparkly diva type front.

As is my practice, I also constructed a handmade envelope to complement my handmade missing you cat card. I printed Moxie with a broken heart in the lower left corner and colored her using gamsol and colored pencils. I sprayed the completed image with sealer to protect it should it travel through the mail.


Final Handmade Monochromatic Blue Missing You Cat Card with Coordinating Handmade Envelope

My handmade missing you cat card in blue and its coordinating handmade envelope.
Handmade Monochromatic Blue Missing You Cat Card & Coordinating Envelope

So there you have it...my monochromatic blue missing you cat card and its coordinating envelope. Inspired by some recycled Christmas paper and a feline diva.

This card set is available in my Polished Moxie Etsy Shop: Missing You Cat Card in Blue.


Card Recipe Specifics for Blue Missing You Cat Card
  • Cardstock: The Paper Company, Hammermill, Wausau
  • Cover Stock: Staples
  • Paper: Recycled Christmas paper
  • Dies: Nestabilities large octagons, Shapeabilities fancy tags, Borderabilities renaissance hearts border
  • Digital Stamp: "Moxie" Cat with a broken heart from Polished Moxie Concepts & Designs
  • Prismacolor Pencils: crimson red, crimson lake, metallic gold, mediterranean blue, blue slate, cloud blue, pink
  • Tools: scoring board, paper cutter, scissors, ruler, blending stumps, computer, cuttlebug machine, piercing needle tool, exacto knife, embossing ball stylus
  • Misc: adhesive, silicon adhesive, gamsol, spray sealer, brads
  • Techniques: gamsol, die cutting, fussy cutting, paper tole

Thank you for visiting my blog and allowing me to share my handcrafted items with you. I hope you enjoyed your visit and will come back soon!

Picture of the Polished Moxie Logo


Page Content © 2012 Polished Moxie Concepts and Designs

Back to inside panel of card


Sunday, November 27, 2011

Handmade Palm Tree Christmas Card and Its Inspiration


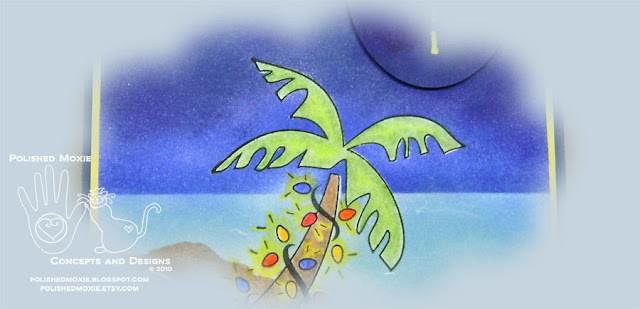
Picture of a portion of the imagery on the front of my Palm Tree Christmas Card
Section of my handmade palm tree Christmas card
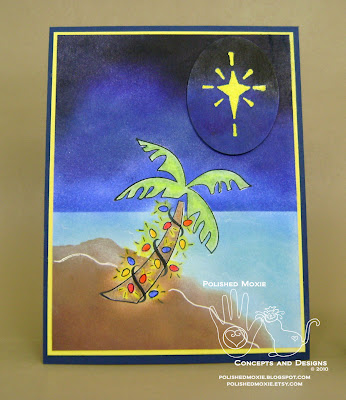
I know it has been quite some time since I have been here, but life got in the way and other priorities prevailed.  I'm back now and have many things to show you.  Today my handmade card is a whimsical Christmas scene in blues, browns, and yellow.  This handmade Christmas card features a sponged beach scene of a palm tree decorated with Christmas lights and the guiding Christmas star in the night sky above. I used two of my favorite coloring techniques on the card: sponging and colored pencil gamsol.

Now you may be wondering what inspired me to make a Christmas card with a palm tree as its focal point especially since I live in the Northeast US.  Well, it was our October surprise.  And what was my October surprise you may ask.  This...

Picture of bird feeding area at beginning of a snowstorm.
Overlooking bird feeders one hour into an October snowstorm

Yep, a snowstorm.  This is one hour into the snowstorm and look at that snow coming down and what is already on the ground.  Here's another view overlooking another part of my garden.

Picture of garden at beginning of a snowstorm.
Overlooking garden one hour into an October snowstorm

You will notice that there are still loads of leaves on them there trees and bushes...not good.  This storm hit before we had even reached our peak leaf peeping weekend.  Two hours later and this is what I saw when I looked out my window.

Picture of bird feeding area 3 hours into a snowstorm.
Overlooking bird feeders 3 hours into an October snowstorm

Picture of garden 3 hours into a snowstorm.
Overlooking garden 3 hours into an October snowstorm

Look how much wet and heavy snow has piled up.  Poor drooping bushes and trees.  Two hours later (five hours into the storm) we were seeing this...

Picture of tree bending to the ground 5 hours into a snowstorm.
Tree bending to ground 5 hours into an October snowstorm

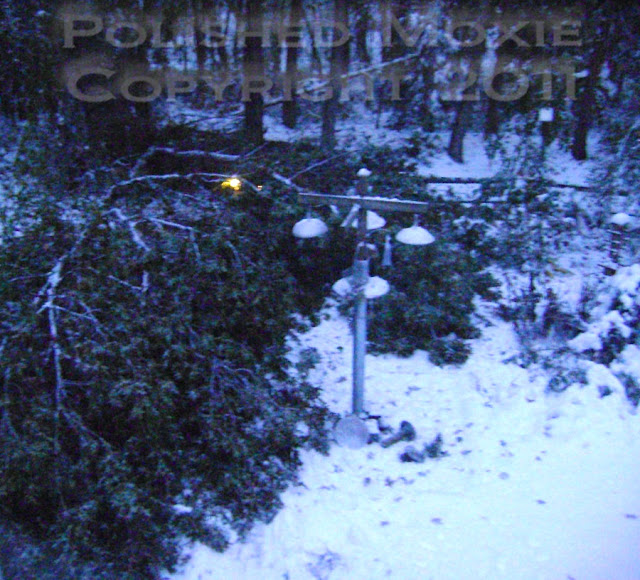
Trees everywhere were bowing to the ground.  You could hear branches popping and thuds as branches and trees broke and hit the ground.  We had several trees break and the next picture is an oak that came down in our yard.

Picture of oak tree that has fallen during a snowstorm.
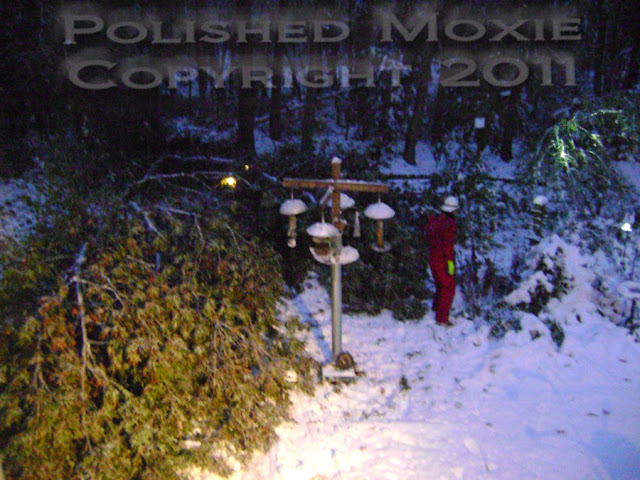
Tree fell during October snowstorm right at dusk

This is a large oak tree branch that we saw bending and happened to actually watch it fall.  It hit my bird feeders and knocked many of them down, but lucky for us it missed the house and the bird feeders survived their trauma.  The tree branch fell right at dusk (you can see one of our night garden lights shining in the picture). I actually had my night critter cam running and caught the whole thing on video.  You can even see a little bird fly out of the tree as it's falling.  On the video you see bark starting to come down from the sky, then a big whoosh of snow as the tree falls.  Too bad my critter cam doesn't have sound.  I'll try to get the video up sometime this week.

From the picture you don't have a good perspective of how big this tree branch really is.  My husband bundled up and braved the storm to rescue my bird feeders and check out the tree.  I got a picture with him in it.  He's over 6 feet tall.

Picture of fallen oak tree with size perspective.
Perspective as to how big the fallen tree is

Big tree with lots of leaves and this is just one of several we lost.  You can see that one of our outdoor spotlights has turned on lighting up the tree.  

It didn't look any better early the next morning (6 a.m.) after 15 inches of snow had fallen in October!!!!

Picture of fallen oak tree after a snowstorm.
Fallen tree the morning after 15 inches of snow

The light is dim because of the earliness of the day and the snow is pretty flattened in this picture because of all of the deer and critter prints.

So, this was the inspiration for my palm tree Christmas card.  I kept looking out my window watching the snow come down, seeing it pile up, and remembering last winter season (oh my aching back). Thoughts of warm tropical beaches kept flitting through my head, so I made my Christmas card based on that fantasy.


Handcrafting My Palm Tree Christmas Card


Card Statistics
  • Final Card Size: 5.5" tall x 4.25" wide
  • Tools: blending stumps, palm tree stamp, Christmas lights stamp, Christmas star stamp, oval die, heat tool, scoring board, paper cutter, anti static bag, Cuttlebug machine, sponge pieces, computer, ruler
  • Materials: cardstock, cover stock, adhesive, embossing powder, inks, artists tape, colored pencils, gamsol, gel pen
  • This Card is Available in My Polished Moxie Etsy Shop: Palm Tree Christmas Card


Front View of Handmade Palm Tree Christmas Card

Picture of the front of my handmade palm tree Christmas card.
Front of my handmade palm tree Christmas Card

To begin my handmade palm tree Christmas card I cut and scored navy blue cardstock for my base card so that my card opens vertically from the bottom. 

For the beach scene on my front card panel I started by stamping the palm tree decorated with Christmas lights on white cardstock and a piece of artist's tape.  I used Stazon ink to stamp both images.  I colored my image on the white cardstock using gamsol and colored pencils.  To protect my colored palm tree image while I sponged on my background, I fussy cut out the image that I had stamped on the artist's tape and used it as a mask.  Because the artist's tape is low tack it does not damage my colored image.  I fussy cut the tape image just inside the black stamped edge so that I didn't get a halo effect around the palm tree when I removed the tape after I finished sponging the background.

To create my background I tore a large curved piece from the corner of a square piece of scrap cardstock so that I had two pieces of cardstock (the curved corner piece and the remainder of the square with the corner torn out).  I used the square with the missing corner to create my beach and mask the remainder of the panel.  The missing portion of the square is my beach so I positioned it where I wanted my beach.  Keep in mind at this point my colored palm tree is masked with its artist's tape image.  Using several shades of brown ink I sponged in my beach.

For the ocean I masked my sponged beach with the piece of cardstock that I had torn from the square.  This is the same shape as my beach and protects it while I sponge the ocean.  I place the mask so that just a tad of the beach edge shows all along it.  Next I determined where I wanted my horizon and used one of the straight edges of my torn square to form the horizon with the rest of the square masking the upper part of my panel where the sky resides.  The area between the masked beach and the straight edge of the square is my ocean.  I sponged several shades of light blue inks in this region to create my ocean.

Once my ocean is completed I flip the square mask downward so that a straight edge is still along the horizon I just created, but the remainder of the square covers the lower portion of my card panel and unmasks the area for my sky.  I position the straight edge of the square so that a tad of my ocean shows all along the horizon line.  Now I sponge in my sky with ink starting at the horizon with my lighter shades of blue and working up the sky with darker shades of blue and a touch of black at the top.

At this point I remove my cardstock masks and use a white gel pen to create waves in my ocean.  I start by creating the white line all along the beach representing water coming onto it.  Then I add waves and ripples to the ocean with the white gel pen and smudge them with my finger.  This gives a translucent effect to the water on the beach and the illusion of distant waves and illumination from the Christmas star that I will put in the sky.  With this step completed I remove the artist's tape from my palm tree and save it for another time.  This completes my front Christmas scene with the exception of my Christmas star.  I matted this scene with yellow cardstock and affixed it to my card base.

For my Christmas star I wanted to add interest and dimension to the card so I decided to pop a panel from the front with the star on it.  I stamped the star on an oval of white cardstock using yellow pigment ink and then embossed it with clear embossing powder.  I determined where I wanted to place my star in the sky and then sponged color on the oval to match that portion of the sky.  When the ink was dry I ironed off the embossing powder by placing a piece of scrap typing paper over the top of it and heating it with a hot iron.  I popped the finished Christmas star element onto the sky with silicone glue so that it is slightly raised from the surface of the card.  This completed the front of my palm tree Christmas card.


Angle Views of Handmade Palm Tree Christmas Card

Picture of my handmade palm tree Christmas card set at a right angle to show the dimensional element.
My handmade palm tree Christmas card set at right angle

Picture of my handmade palm tree Christmas card set at a left angle to show the dimensional element.
My handmade palm tree Christmas card set at a left angle

These angle views of my palm tree Christmas card show you the dimensional element of the Christmas star.


Inside Panel of Handmade Palm Tree Christmas Card

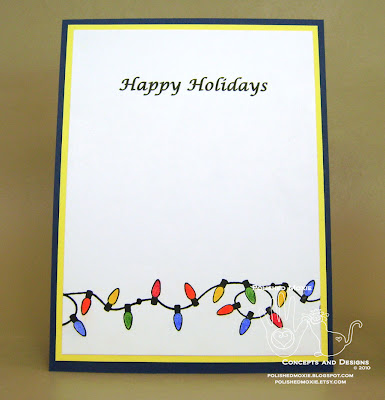
Picture of the inside panel of my handmade palm tree Christmas card.
Inside my handmade palm tree Christmas card

I kept the inside panel of my palm tree Christmas card relatively simple.  I printed "Happy Holidays" on white cardstock and stamped a string of Christmas lights along the lower edge.  Using colored pencils and gamsol I colored the lights.  To complete the card panel I matted it with yellow cardstock and attached it to my card base.

I also constructed a handmade envelope from heavy cover stock to compliment my palm tree Christmas card.  To decorate it I stamped a string of Christmas lights along its lower edge and colored them using gamsol and colored pencils.  I sprayed the image with sealer to protect it.


Final Handmade Palm Tree Christmas Card and Envelope Ensemble

Picture of my completed handmade palm tree Christmas card and its coordinating envelope.
My handmade palm tree Christmas card and its coordinating envelope

I have to say I was feeling the warmth when I finished this card.  Too bad it had not melted all of the snow that awaited me outside.

My handmade palm tree Christmas card and its coordinating envelope are available in my Polished Moxie Etsy Shop: Palm Tree Christmas Tree.


Card Recipe Specifics
  • Cardstock: The Paper Company, Wausau
  • Cover Stock: Staples
  • Die: Nestabilities classic ovals small
  • Stamps: Studio G (palm tree and star), Recollections (Christmas lights)
  • Inks: Stazon (black), Colorbox Fluid Chalks (browns and blues), Colorbox Pigments (blues, yellow, black), Delta embossing ink
  • Embossing Powder: Stamp 'n Stuff
  • Colored Pencils: Koh-I-Noor (8750/19 light green, 8750/4 dark green, 8750/13 dark yellow, 8750/6 blue, 8750/10 fuchsia, 8750/23 dark brown, 8750/11 light brown, 8750/9 orange, 8750/1 bright yellow)
  • Tools: Darice heat tool, Martha Stewart scoring board, Making Memories paper cutter, Cuttlebug machine, anti static bag, blending stumps, sponge pieces, ruler, computer
  • Misc: Pro artist's tape, adhesives (YES, silicone), Signo white gel pen, Krylon spray sealer, gamsol
  • Techniques: sponging, gamsol, fussy cutting, masking, die cutting


Thank you for visiting my blog and allowing me to share my handcrafted items with you. I hope you enjoyed your visit and will come back soon!

Picture of the Polished Moxie Logo


Page Content © 2011 Polished Moxie Concepts and Designs


Related Posts Plugin for WordPress, Blogger...